

SSO with Google Workspace
Shelf supports single sign-on (SSO) using Google Workspace (formerly known as GSuite). Enterprise or Organization plan only.

Works with any SAML 2.0 identity provider. This guide uses Google Workspace as the example, but Shelf's SSO is IdP-agnostic — the same setup applies to Microsoft Entra ID, Okta, Shibboleth, and other SAML 2.0 providers. The group-to-role mapping described below works identically across all of them. If you use a different provider, share its metadata with your Shelf contact and follow the equivalent steps in your IdP's admin console.
Before You Start: Prerequisites
SSO changes how accounts on your domain are created and managed, so a few things must be in place before the connection is activated. Most setup confusion comes from skipping these — please read them carefully.
1. You need one non-SSO account to own the workspace
Shelf SSO requires one non-SSO user to own the workspace. This account's only job is to own the workspace and configure the SSO settings (the group-to-role mapping); it is not used for daily work. Owners typically sign in only during the initial setup or when adjusting the configuration later.
Important: This account must be created before SSO is activated. Once your domain is configured as an SSO domain, no more non-SSO accounts can be created on that domain. If you don't have this owner account ready beforehand, you will be locked out of administrative changes.
2. Decide the fate of any existing workspace
If you already have a workspace that was used for testing or trials (for example, one created with a few standard accounts), decide whether you want to keep it together with all the assets inside it, or start fresh. Let your Shelf contact know so the right workspace is connected to SSO.
3. Remove existing standard accounts on the SSO domain
Any existing standard (non-SSO) accounts that use the SSO domain — for example jane@yourdomain.com and joe@yourdomain.com — must be removed so that new accounts can be created through SSO login. Once an email is linked to a standard account it cannot log in via SSO, and once the domain is an SSO domain no new standard accounts can be created on it. Share the list of these accounts with your Shelf contact, who will remove them at the right point in the setup.
4. Plan your group-to-role mapping
Shelf decides which role a user gets by matching the groups they belong to in your identity provider. You map those groups to Shelf roles (Administrator, Self service, Base) in the workspace settings. You only need to map the roles you actually use — a single group mapping is enough for SSO to work. You do not need to create a group for every role.
Set Up SSO with Google Workspace
Shelf supports single sign-on (SSO) using Google Workspace (formerly known as GSuite). To set up SSO with Google Workspace, follow these steps:
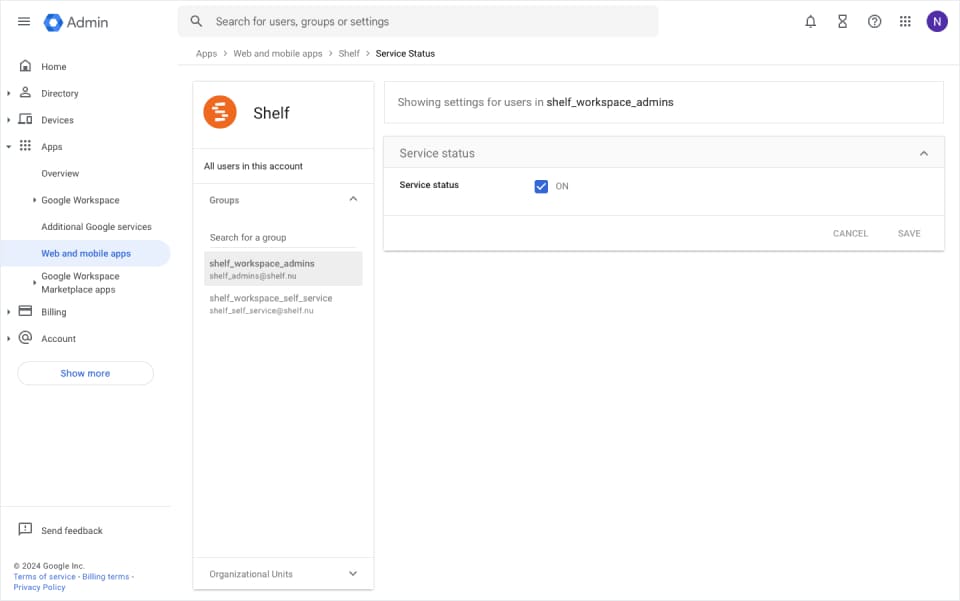
Step 1: Open the Google Workspace Web and Mobile Apps Console
Navigate to the Google Workspace console.
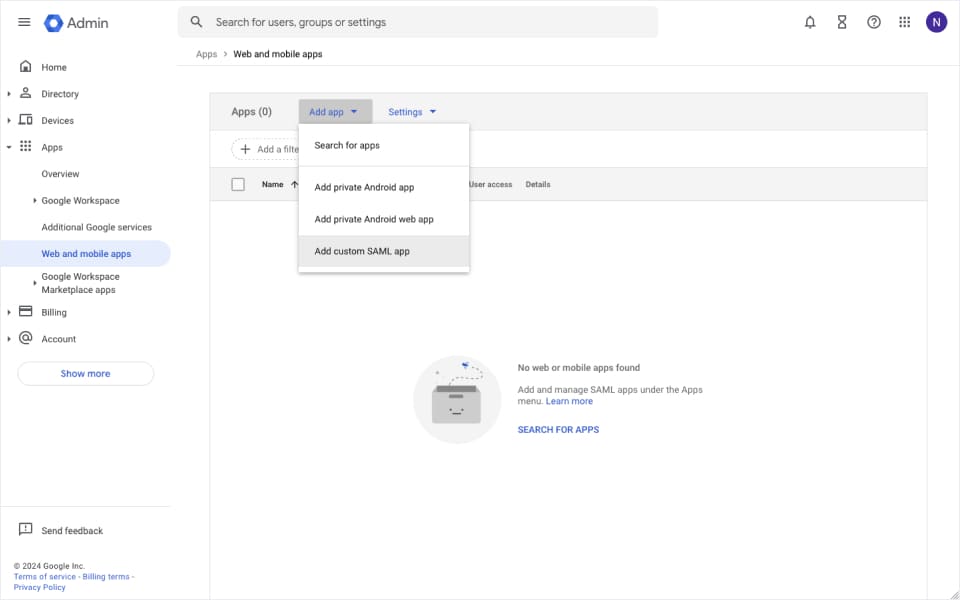
Step 2: Choose "Add custom SAML app"
From the Add app button in the toolbar choose Add custom SAML app.
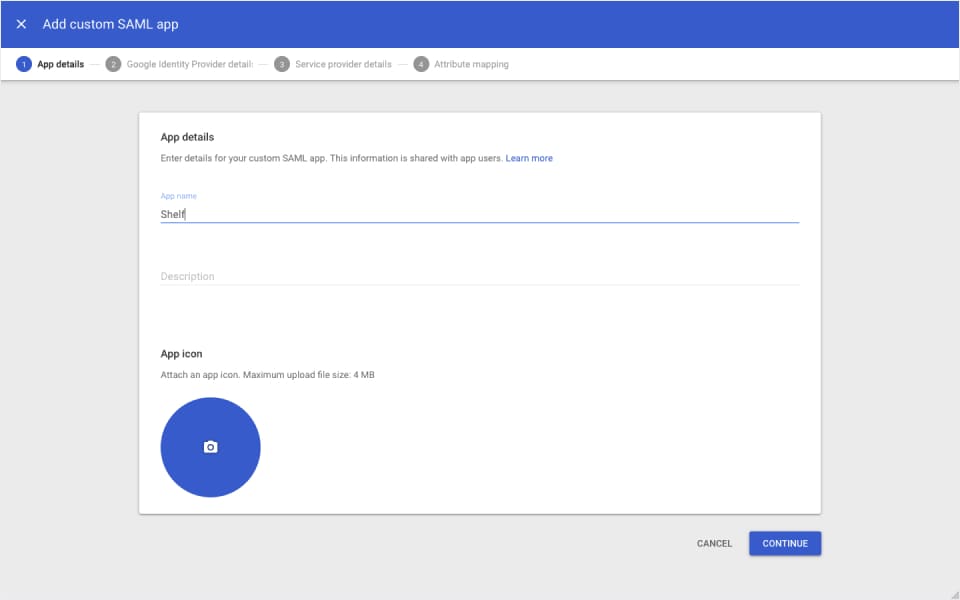
Step 3: Fill Out App Details
The information you enter here is for visibility into your Google Workspace. You can choose any values you like. Optionally enter a description.
Step 4: Download IdP Metadata
This is a very important step. Click on DOWNLOAD METADATA and save the file that was downloaded.
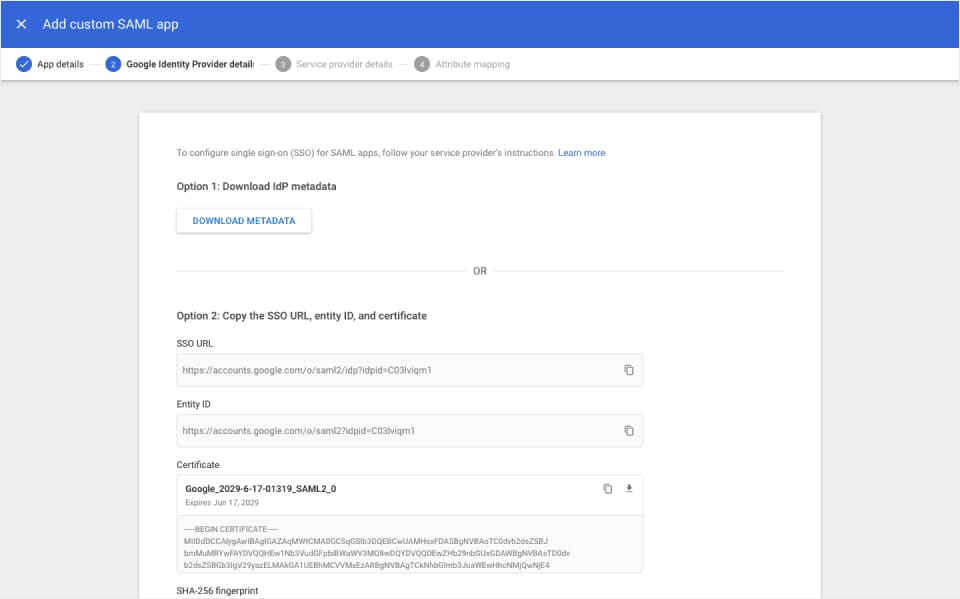 It is very important to send this file to your support contact at Shelf to complete the SSO setup process. If you are not sure where to send this file, you can always reach us at hello@shelf.nu.
Important: Check the expiration date of the certificate in the metadata. Ensure there is at least 1 year left before it expires, and mark the date in your calendar to remind yourself to update the certificate without causing downtime for your users.
Step 5: Add Service Provider Details
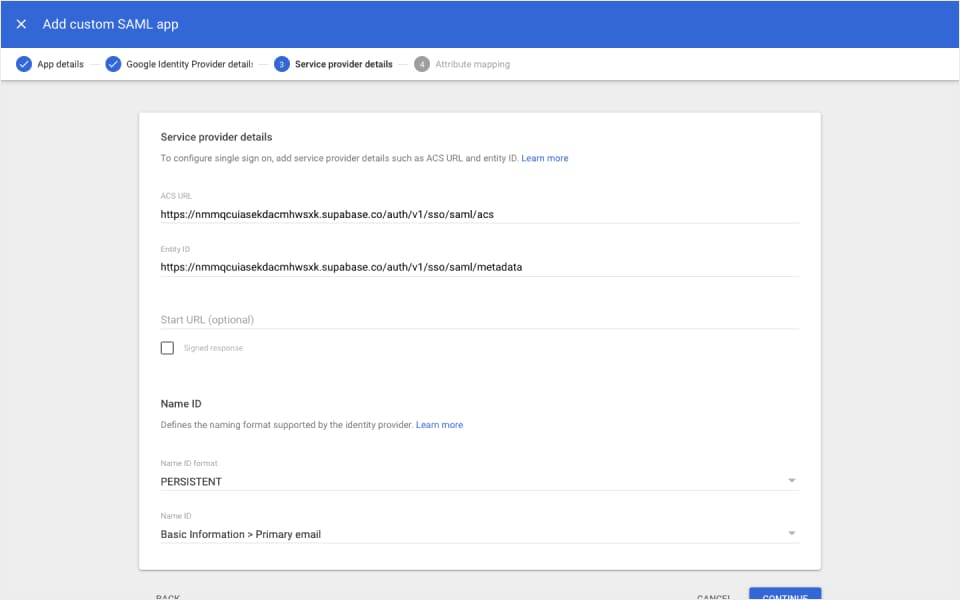
Configure the Service Provider Details on the next screen:
| Detail | Value |
|---|---|
| ACS URL | https://nmmqcuiasekdacmhwsxk.supabase.co/auth/v1/sso/saml/acs |
| Entity ID | https://nmmqcuiasekdacmhwsxk.supabase.co/auth/v1/sso/saml/metadata |
| Name ID format | PERSISTENT |
| Name ID | Basic Information > Primary email |
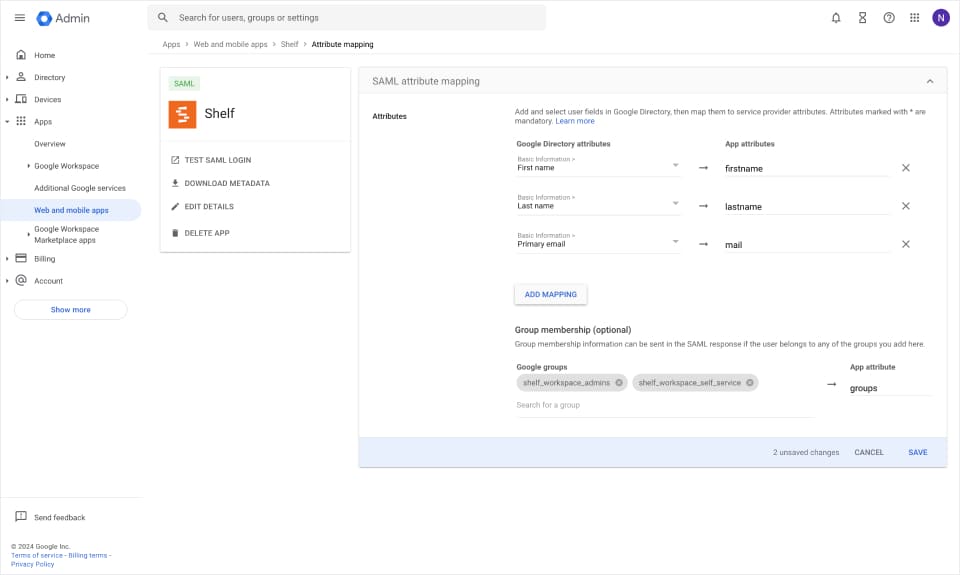
Step 6: Configure Attribute Mapping
Attribute mappings allow Shelf to get information about your Google Workspace users on each login.
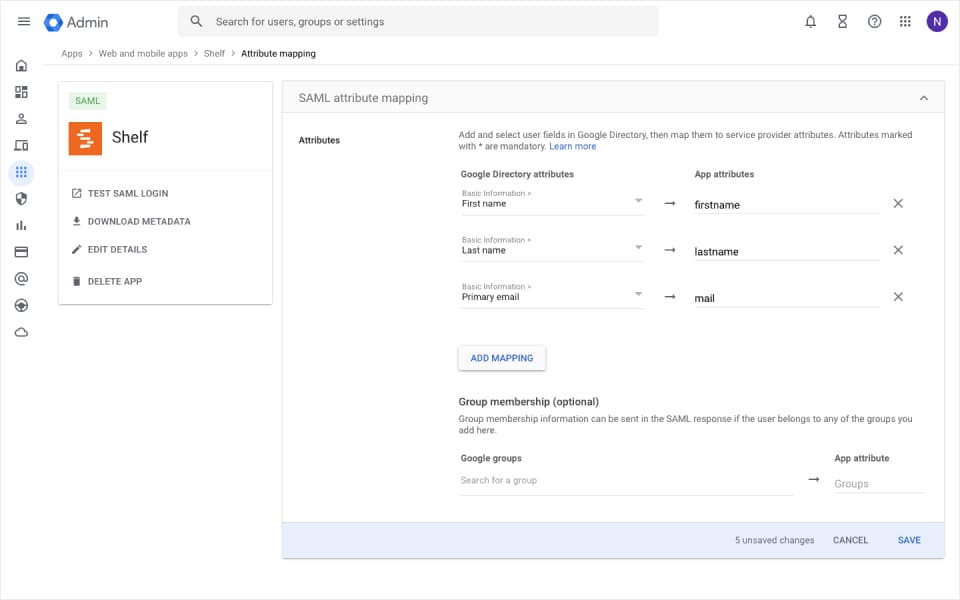 All attribute mappings are required. If in doubt, replicate the same config as shown in the documentation.
NOTE: You will come back to this step at a later stage once you have your groups created and users assigned.
Step 7: Wait for Confirmation
Once you have configured the Google Workspace app as shown above, make sure you send the metadata file you downloaded to your support contact at Shelf.
This information needs to be entered into Shelf before SSO is activated end-to-end.
Wait for confirmation that this information has successfully been added to Shelf. It usually takes 1 business day to configure this information for you.
In the meantime, you can continue with the next steps that will show you how to setup your groups and users.
Step 8: Create Groups and Assign Users
In order to manage which users get access to which workspace and with what role, Shelf uses groups for the mapping. Shelf has three roles you can map a group to:
- Admin group
- Self service group
- Base user group
You only need to create a group for the roles you actually use — mapping a single group is enough for SSO to work. For example, if everyone on your team should have the same role, one group is all you need. Create additional groups only if you want different users to get different roles.
8.1: Create Your Groups in Google Workspace
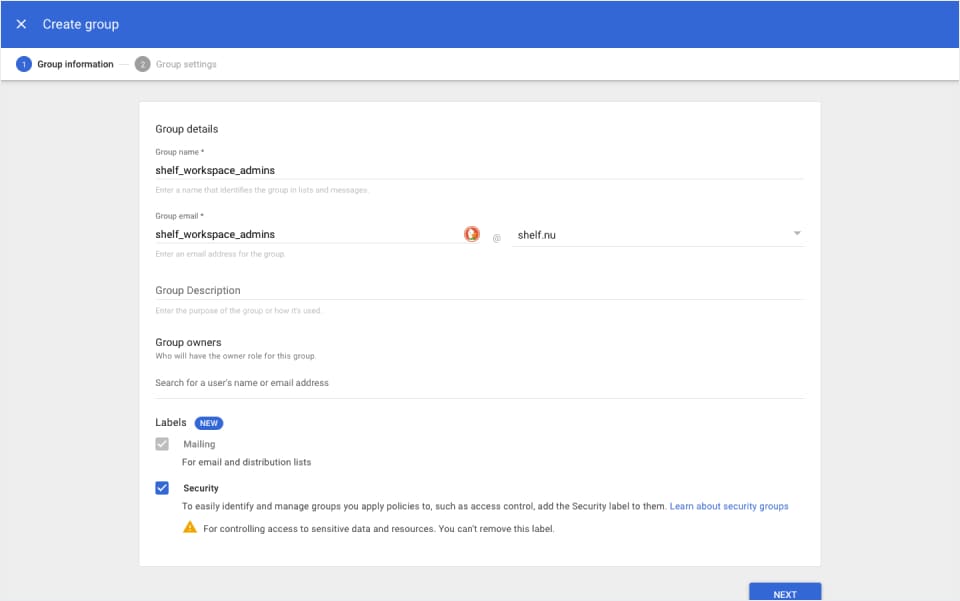
First step is to create the groups in the Google Workspace. Inside your admin panel, navigate to Directory > Groups > Create group.
Add a name, email and make sure the group is labeled as security. Optionally fill in the other fields as well. Create one group per Shelf role you want to use (you need at least one).
Note: Due to how Google Workspace works, it returns group names instead of IDs when a user logs in. Shelf matches these case-insensitively and ignores any surrounding spaces, so capitalization differences won't cause a mismatch. Using simple, consistent group names still keeps the mapping easy to read.
8.2: Assign Members to Each Group
Assign members to respective groups through your Google Workspace administration panel. Ideally, members should belong to one group within the same workspace. If they are part of both groups, the admin role will take priority.
8.3: Allow Groups Access to Shelf App
Configure Google Workspace user access to grant permission to the Shelf application for selected groups:
- Click on the "User access" card or the down-arrow
- Follow the on-screen instructions
Google system changes might require waiting for at least 15 minutes for full propagation.
8.4: Map Groups to App Attributes
Once you have created all your groups, you have to make sure to add them to the attributes returned by the app.
Make sure to add all groups that you want to access Shelf. The App attribute name should be groups.
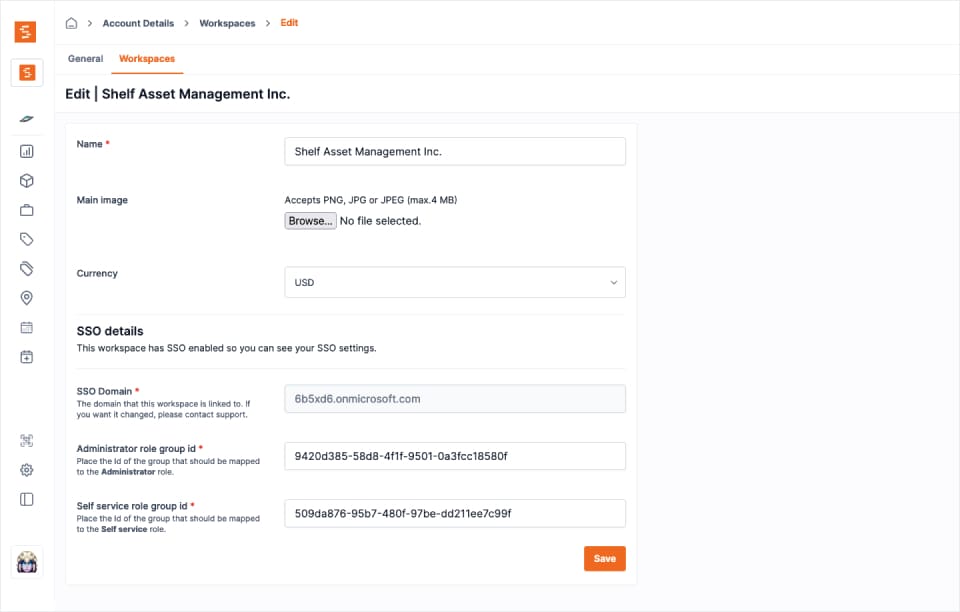
Step 9: Map Google Workspace Groups Inside Shelf
Once you have the groups ready, you need to add their names in the workspace settings inside Shelf. If you have multiple workspaces, you will need to map each one.
 Go to the workspace settings and place the name of each group next to its matching role (Administrator, Self service, Base). You only need to fill in the roles you use — leave the others blank, but at least one group must be mapped.
Each role field accepts one or more group names, separated by commas, so several identity-provider groups can map to the same Shelf role — useful when different departments or affiliations should all land on, for example, Self service. If a user belongs to groups that map to more than one role, the higher role wins (Administrator > Self service > Base).
Important: Matching is case-insensitive and ignores surrounding spaces, so you don't have to match capitalization exactly. Still, paste each group name as it appears in your identity provider to avoid typos. Values containing an
=(such as an LDAP distinguished name likeou=staff,dc=example,dc=edu) are treated as a single group value and are never split on commas.
Step 10: Test Single Sign-On
Once you have completed all the steps above, ask one of those users to help you out in testing the setup.
It often helps to ask them to log out of their Google account and log back in.
Ask them to enter the domain in the Login with SSO page.
If sign in is not working correctly, reach out to your support contact at Shelf.
Personal Workspaces and SSO
When you sign in via SSO, your personal workspace is hidden — you only see the team workspaces your administrator has assigned to you. This ensures SSO-managed users always operate in the correct organizational workspace rather than their personal space.
No Workspace Assigned?
If your SSO account has not been assigned to any team workspace, you will see a "No workspace assigned" page after login.
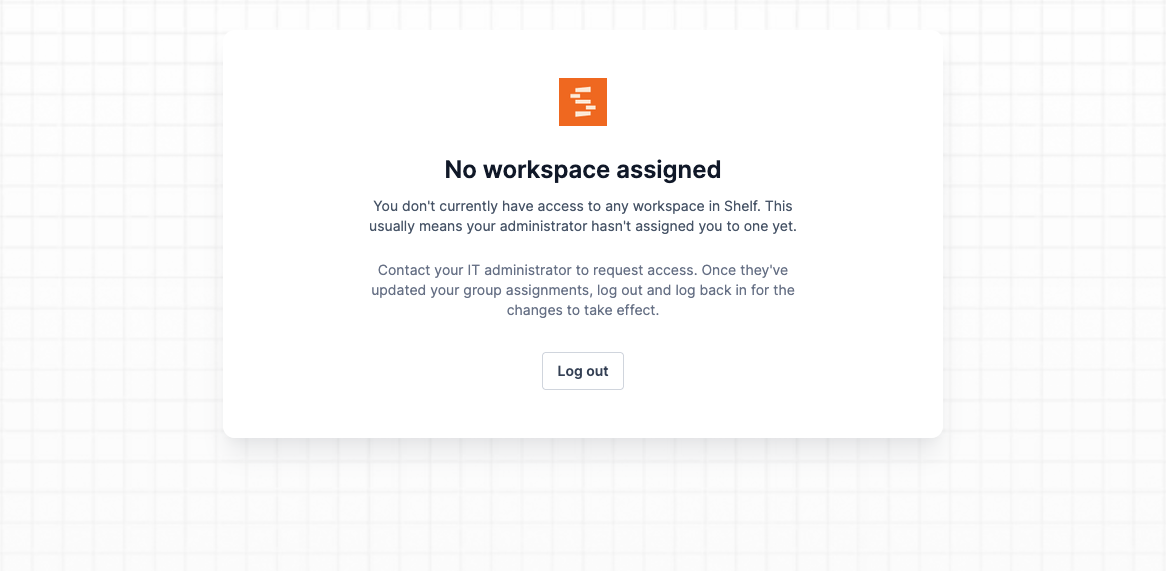
This happens when:
- You've just signed up via SSO for the first time and your administrator hasn't assigned you to a group yet
- Your group access has been revoked by an administrator
What to do: Contact your IT administrator and ask them to assign you to the appropriate workspace group in your identity provider (e.g., Google Workspace). Once assigned, log out and log back in — Shelf will redirect you to your workspace automatically.
Note: Your personal workspace still exists in the background, but it is not accessible while you are signed in via SSO.
Signed In, but Nobody Can Give You Custody?
A rare failure used to leave an SSO account half-created: the user could sign in and see the workspace, but no team-member record existed for them, so they could not be given custody of an asset and did not appear where custodians are chosen. Nothing the user or the administrator could do from the interface fixed it, because every later sign-in saw the workspace access already in place and assumed the rest was too.
Both halves are now closed. The two records are written together, so the state cannot be created in the first place, and any account already in it repairs itself the next time that person signs in — as long as their group still maps to a role. Nothing needs to be re-invited or re-created.
If someone is affected, ask them to sign out and sign back in. If they still do not appear as an available custodian afterwards, that is a group mapping problem rather than this one — check Step 9.
Setting a Custom Display Name (SSO Users)
When you sign in via SSO, Shelf uses the first and last name provided by your identity provider (e.g., Google Workspace). If your colleagues know you by something else, set a custom Display Name and Shelf uses it instead wherever it names you.
How to Set Your Display Name
- Navigate to Account Settings (click your avatar in the top right)
- Go to the General tab
- Find the Display Name card
- Enter your preferred display name and save
Where Your Display Name Appears
Everywhere the web app names a person, it now names you by your display name. That covers:
- The custodian and creator chips on the assets, kits, bookings and locations lists, on calendar cards, and on an audit's asset list
- The Custody column on the advanced asset index, including its simple-mode equivalent
- Notes and activity entries on assets, bookings, kits, locations and audits, on the entry you have just typed as well as on older ones
- The dashboard's custodian widgets, the command palette, reports, and audit PDFs
- The greeting at the top of emails Shelf sends you, which uses your display name where you have one and your first name otherwise, so it stays a greeting rather than reading out a full name
Searching and sorting follow it too. Typing a colleague's display name in the asset search finds what they are holding, and sorting a team list by name orders by the display name where one is set. A name you can see but cannot search for would not be much of a name.
Where It Deliberately Does Not Appear
Four places keep the legal name on purpose, and each is doing a job the display name would break:
- The Shelf Companion app still shows the name your identity provider supplied. The mobile API sends your display name now, but the app's own screens pick it up in a future release rather than the shipped one.
- Invoices and billing documents carry the name registered for billing. An invoice is a financial record.
- Directory sync (SCIM) exchanges the
givenNameandfamilyNameyour identity provider owns, because that is the protocol's contract with your IdP rather than a screen anyone reads. - The Team page shows both, which is the point of it. See below.
Note: The Display Name card is only shown for SSO users. Users who signed up with email/password manage their name through the standard first name and last name fields.
Display Name on the Team Page
Workspace administrators can see SSO users' display names on the Team page. Display names appear in brackets next to the SSO-provided name, making it easy to identify who has customized their display.
SSO in the Shelf Companion Mobile App
Single sign-on works in the Shelf Companion app too, on both iPhone and Android. When you tap Sign in, the app opens your organization's SSO flow in a secure in-app browser — the same login screen you use on the web. Your identity provider handles the password, one-time code, and any multi-factor step, then returns you to the app signed in. No separate mobile credentials are needed.
This means SSO-managed field teams can scan, run audits, manage custody, and handle booking check-in/check-out from their phones using the same single sign-on the organization already requires. See Getting Started with Shelf Companion for the full mobile sign-in walkthrough.
Ready to try Shelf?
Put what you're learning into practice. Free plan available — no credit card required.