Importing Assets to Shelf: CSV Guide
A comprehensive guide on how to prepare and import asset data using CSV files into Shelf, covering file requirements, standard columns, custom fields, barcodes, and troubleshooting.

Shelf supports two CSV workflows for assets:
- Create new assets — this guide covers importing a CSV file to add new asset records to your inventory.
- Update existing assets — if you want to bulk-edit records already in Shelf, use the Bulk Updating Assets via CSV workflow instead.
Shelf enables users to import assets through CSV (Comma-Separated Values) files. The platform provides a template-based approach with validation to ensure data integrity during the import process.
Quick Start
To begin importing assets:
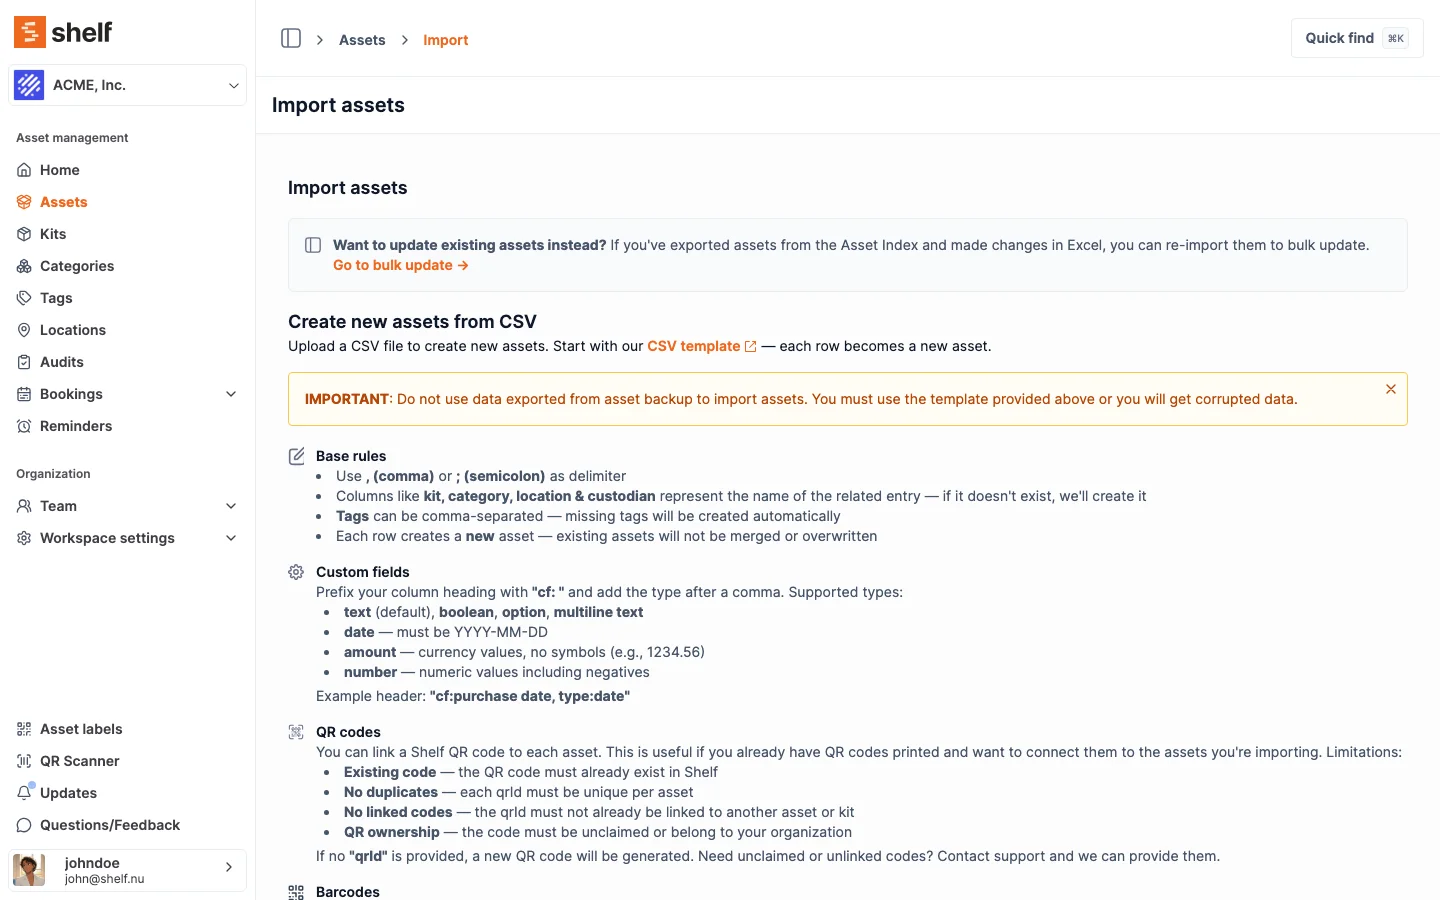
- Download the CSV template or barcode-enabled version from Shelf
- Add your asset information following the provided format
- Save the file with UTF-8 encoding
- Navigate to Assets then Import in your workspace
- Upload the file and confirm with "I AGREE"
Important: Never use data exported from asset backup to import assets, as this may cause data corruption.
File Requirements
Basic Format Rules
- Delimiter: Comma (
,) or semicolon (;). Shelf auto-detects whichever character appears more often across the whole file — pick one and stick to it. - Quoting: Wrap any value containing the delimiter, a double quote, or a newline in double quotes (
"…"). Escape an internal"by doubling it (""). This matters fortagsand multi-valuebarcode_*cells in a comma-delimited file, and forcf:…,type:…custom-field headers in a comma-delimited file (see Custom Fields below). - Encoding: UTF-8 recommended. Other encodings are auto-detected and converted, and a UTF-8 BOM is accepted.
- Header row: First row must contain column headers. Headers are case-sensitive and strictly validated against Shelf's allow-list — an unknown header aborts the entire import with "Invalid header provided."
- File format: Only
.csvfiles accepted.
Standard Columns
| Column | Required | Purpose | Example |
|---|---|---|---|
title | Yes | Asset name | "MacBook Pro 13-inch" |
description | No | Detailed information | "Company laptop with 256GB storage" |
category | No | Asset category | "Laptops" |
kit | No | Kit grouping | "Developer Kit" |
tags | No | Comma-separated labels (inside one cell) | "electronics,portable" |
location | No | Physical location | "Office Floor 2" |
custodian | No | Team member assignment (by name) | "John Doe" |
bookable | No | Booking capability — only no disables booking | "yes" |
imageUrl | No | Public http(s) link to an image (no file extension required) | "https://example.com/image.jpg" |
valuation | No | Asset monetary value (plain number, . decimal) | "1200.50" |
qrId | No | Existing unclaimed Shelf QR code identifier | "qr_abc123" |
Auto-creation: category, kit, location, tags, and custodian are matched by name and created automatically if they don't already exist in your workspace — you don't need to pre-create them. For custodian specifically, Shelf creates a non-registered team member (NRM) with that name. The column is matched by name, not email — using an email address will create an NRM literally named john@company.com.
bookable semantics: anything other than the literal string no (including blank, yes, true) leaves the asset bookable. Use no to opt out.
imageUrl semantics: any publicly reachable http(s) URL works — the link no longer has to end in .png, .jpg, or .jpeg. Dynamic image endpoints (for example an ASP.NET handler like https://host/GetImage.ashx?guid=… that serves image bytes from a query string) import correctly. Shelf downloads the URL and confirms the file is a real image (PNG, JPEG, GIF, WebP, or BMP) from its contents, not from the URL text, so a link that doesn't actually return an image is rejected after the download attempt.
Multi-value cells: tags (and the barcode_* columns below) hold multiple values separated by commas inside a single cell. In a comma-delimited file the cell must be double-quoted ("high-priority,fragile"); in a semicolon-delimited file no quoting is needed.
Advanced Features
Custom Fields
Create custom fields using the header format: cf:FieldName,type:TypeName
If the field doesn't exist in your workspace, Shelf creates it on import with the type from the header. cf: is case-insensitive; the field name is trimmed.
Supported field types (exactly seven):
- text -- Standard text input (default if
type:is omitted) - multiline text -- Extended text areas / markdown
- option -- Dropdown selections. Allowed values are collected automatically from the data in that column — you do not declare options in the header
- boolean -- Accepts
yesornoonly (case-insensitive). Any other value (includingtrue,false,1,0) is silently skipped for that row - date --
YYYY-MM-DDonly. Any other format is a hard error - amount -- Plain number with
.decimal. Uses your organization's currency — there is no per-column currency. Currency symbols and thousands separators are rejected - number -- Plain number, negatives allowed. Same numeric rules as amount
Example custom field CSV (comma-delimited — the headers must be double-quoted because they contain commas):
title,"cf:Purchase Date,type:date","cf:Warranty Status,type:option"
MacBook Pro,2023-12-15,Active
iPhone 14,2024-01-10,Expired
If you use semicolon (;) as the delimiter instead, the commas inside cf:…,type:… are not the delimiter, so the headers do not need to be quoted:
title;cf:Purchase Date,type:date;cf:Warranty Status,type:option
MacBook Pro;2023-12-15;Active
iPhone 14;2024-01-10;Expired
QR Code Integration
Link imported assets to existing Shelf QR codes:
- QR code must already exist in your workspace
- Each QR code must be unique
- Cannot already be linked to assets or kits
- Must belong to your organization
If no QR ID is provided, Shelf automatically generates new codes.
Barcode Support (Paid Add-on)
The Alternative Barcodes add-on must be enabled before importing any barcode_* data. The behavior when it is not enabled is asymmetric and worth knowing up front:
- A populated
barcode_Code128,barcode_Code39, orbarcode_DataMatrixcolumn hard-fails the whole import with a 403 error ("Your workspace doesn't have barcodes enabled"). - A populated
barcode_ExternalQRorbarcode_EAN13column is silently ignored — the import succeeds, but no barcodes are created on those rows.
Enable the add-on first if any of these columns contain data you need.
Supported barcode types (exact header names, case-sensitive):
- barcode_Code128 — 4-40 characters, ASCII printable (letters, numbers, symbols)
- barcode_Code39 — 4-43 characters,
A-Zand0-9only - barcode_DataMatrix — 4-100 characters, ASCII printable
- barcode_ExternalQR — 1-2048 characters, any UTF-8 — case is preserved
- barcode_EAN13 — exactly 13 digits, with a valid check digit (Shelf rejects invalid check digits)
Barcode rules:
- For multiple barcodes of the same type on one asset, separate values with commas inside that single cell (e.g.
LAT5550-001,LAT5550-002). In a comma-delimited file the cell must be wrapped in double quotes. - Values must be unique within the file and across your workspace; duplicates are surfaced before import.
- Code128, Code39, DataMatrix, and EAN13 are upper-cased on save; ExternalQR preserves the original case.
Example barcode CSV (comma-delimited, with a valid EAN13 and a multi-value Code128 cell):
title,barcode_Code128,barcode_EAN13
Laptop,"LAP001,LAP002",9780201379624
Mouse,MOUSE001,4006381333931
Kit and Custody Management
When importing assets with custodians and kits:
- New kits automatically inherit custody from their assets
- Empty existing kits update to match asset custodian
- Kits with existing assets validate for consistency
Import Process
Pre-Import Validation
The system checks:
- File format and encoding validity
- Header accuracy against supported columns
- QR code availability and status
- Barcode feature permissions
- Kit-custody conflict prevention
- Custom field format compliance
Import Execution Order
- Related entities creation (categories, locations, kits, members)
- Image processing and validation
- Asset creation with properties
- QR code linking or generation
- Barcode generation (if enabled)
- Kit custody assignment
- Custom field value processing
Partial Imports on Failure
Asset import is not transactional. Up-front validation catches header, QR, barcode, and kit/custody problems before any row is created — but once row creation begins, rows are processed one by one. If a row fails mid-file, the rows already created persist and the import aborts at the failing row. Re-importing the same file would then create duplicates of those earlier rows.
If you see a partial-import result, check your Asset Index for what was created, fix the failing row, and re-import only the remaining rows. For round-trip edits to existing assets, use Bulk Updating Assets via CSV instead.
Troubleshooting
Common Error Messages
"Invalid headers in csv file"
- Verify column headers match exactly
- Check custom field format:
cf:FieldName,type:TypeName - Remove extra spaces or special characters
"CSV file is empty"
- File requires minimum 2 rows (headers + 1 data row)
- Confirm file saved properly as
.csv
QR Code Issues
- Duplicate codes: Each qrId must be unique in import
- Non-existent codes: Must exist in Shelf beforehand
- Already linked: Cannot link to other assets or kits
- Wrong organization: Must belong to your workspace
Kit Custody Conflicts
- All assets in a kit must share the same custodian
- Cannot assign different custodian to kit with existing assets
Data Format Issues
Date fields not importing:
- Use only YYYY-MM-DD format (e.g., 2024-01-15)
- Avoid MM/DD/YYYY or DD-MM-YYYY formats
Boolean fields incorrect:
- Custom-field booleans accept only
yesorno(case-insensitive).true,false,1,0are silently skipped — the value will not be saved. - The
bookablecolumn treats anything other than the exact stringnoas bookable, sofalse, blank, andyesall leave the asset bookable. Usenoto opt out.
Tags not separating:
- Separate tags with commas inside a single cell:
electronics,laptop,portable. Spaces around commas are trimmed automatically, soelectronics, laptopresolves to the taglaptop, notlaptop. - In a comma-delimited file the whole
tagscell must be wrapped in double quotes ("electronics,laptop"); in a semicolon-delimited file no quoting is needed.
Custodian not found:
- The
custodiancolumn is matched by name, not email. Use the exact display name (e.g.John Doe). - If no team member by that name exists, Shelf creates a non-registered team member automatically — you do not need to pre-create them. Using an email address will create a team member literally named after the email.
Best Practices
Before Importing
- Clean data and remove empty rows
- Test with small batch (5-10 assets) first
- Back up existing data before large imports
- Plan your categories, locations, and kits — you don't need to create them up front (they're auto-created on import), but a clean naming scheme makes the result tidier
After Importing
- Review all imported assets for accuracy
- Verify kit, category, and location linkages
- Test QR code scanning
- Update team member permissions
Large Imports (1000+ assets)
- Break into smaller batches
- Ensure stable internet connection
- Allow extra time for processing
- Account for image download time
Related Resources
- Bulk Updating Assets via CSV — edit existing asset records in bulk using an exported CSV
- Export / Exporting Workspace Data from Shelf — how to export your assets for bulk update
- Adding additional fields to Assets
- Alternative Barcodes
Contact support if you need personalized assistance with a specific CSV file.
Ready to try Shelf?
Put what you're learning into practice. Free plan available — no credit card required.