

How to Create a Booking
This guide covers the steps needed to reserve and check out assets to a person within your organization using Shelf's booking feature, ensuring equipment availability when needed.

With a booking, you can reserve and check-out a selection of assets to a person (custodian) within your organization. Bookings help ensure that certain equipment is available when you or a team member needs it.
Creating a booking
Start by going to the Bookings area.
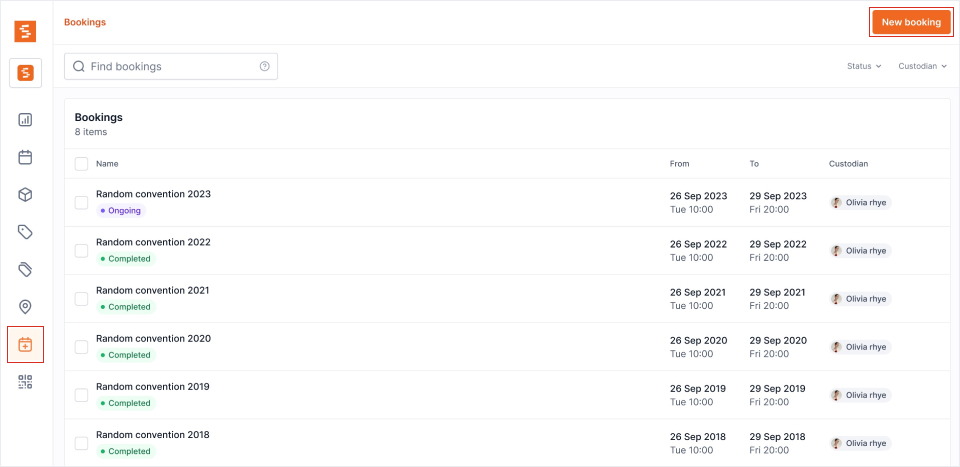
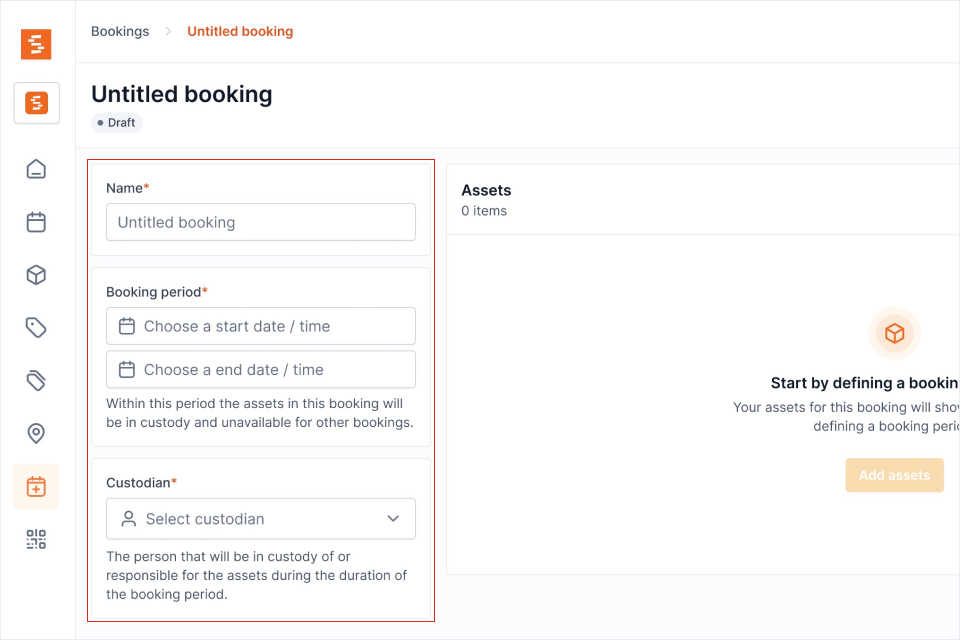

- Click New booking to create a booking
- Give your booking a Name
- Specify a Booking period by choosing a start and end time/date
- Select a Custodian to whom the assets will be checked out
- Click Add assets to add assets to the booking. This is only possible after configuring the booking period
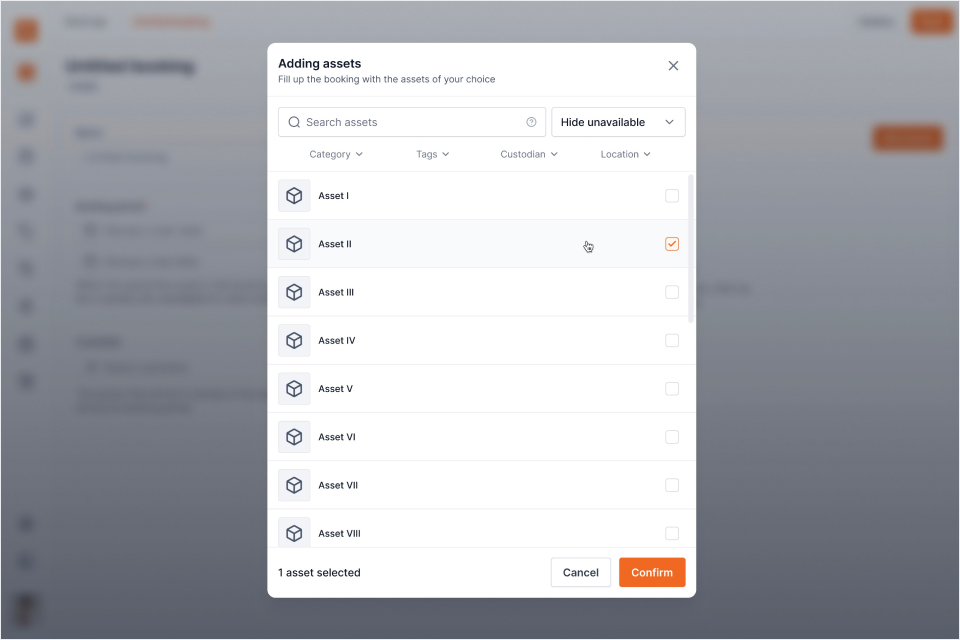
- Use the Asset manager modal to find and add/remove assets from the booking. You can use the filters and search bar to quickly find assets. Only assets that are Available during the specified booking period will show by default.
- Click Confirm when you've added the assets
- Optionally, expand the Notification recipients section to add specific users who should receive email updates about this booking (in addition to the custodian and workspace defaults)
- Click Reserve to confirm the booking. Base users see the same button labelled Request reservation. The status of the booking will change from Draft into Reserved or Ongoing depending on the current date/time and the start date/time specified under booking period
The Custodian list is set by your role. Administrators and Owners can name anyone in the workspace, and can search the list. Self-service and Base users see one name — their own — because the booking they are making is for themselves; that is what makes a Base user's booking a request an administrator releases. The list is decided on the server, so it reads the same in the Shelf Companion app as it does here, and the workspace's custody visibility setting does not widen it.
Reserve stays greyed out until the booking holds at least one asset or one model reservation, and nothing on it is marked unavailable or already booked for your dates. The button's tooltip names which of the three is in the way. See Troubleshooting: Booking Conflicts.
The booking period picker reads in your own date format, time format, and time zone, and its calendar starts the week on the day you chose. Set those once under Account settings → General. Because they belong to your account rather than the workspace, a custodian in another country reads the same booking on their own clock, and the email they get is formatted for them.
Your time zone is what the times mean, on every route into a booking: this form, the Create booking dialog on the Assets page, Extend booking, Duplicate, and the Shelf Companion app. On the phone, if you have set a time zone on your account, that is the one used rather than whatever zone the handset happens to be in, so a booking you make on the road still means the hours you intended.
The one thing your time zone does not move is the workspace's working hours. Those are the opening times of the physical location, the same for everyone.
Export a booking to your calendar
Once a booking is no longer in Draft status (Reserved, Ongoing, Overdue, or Completed), you can export it as a calendar event. Open the booking and click Add to Calendar to download an .ics file. Opening this file adds the booking event — including the start and end dates and a direct link back to the booking — to Google Calendar, Apple Calendar, Outlook, or any RFC-compliant calendar app.
This is useful for custodians who want the reservation to appear in their personal calendar, and for managers who need to keep their schedule aligned with Shelf bookings.
Related articles
Ready to try Shelf?
Put what you're learning into practice. Free plan available — no credit card required.