

Exporting Data from Shelf
Export asset data from Shelf as CSV: selected assets, filtered results, or a full workspace backup. Covers the Standard and Import-ready formats, what each includes, and common reporting scenarios.
Shelf provides multiple ways to export asset data as CSV — whether you need a selection of items, a filtered view, or a full workspace backup. This guide covers all three methods, what each includes, and the reporting scenarios they're best for.
Three Export Methods
1. Export Selected Assets
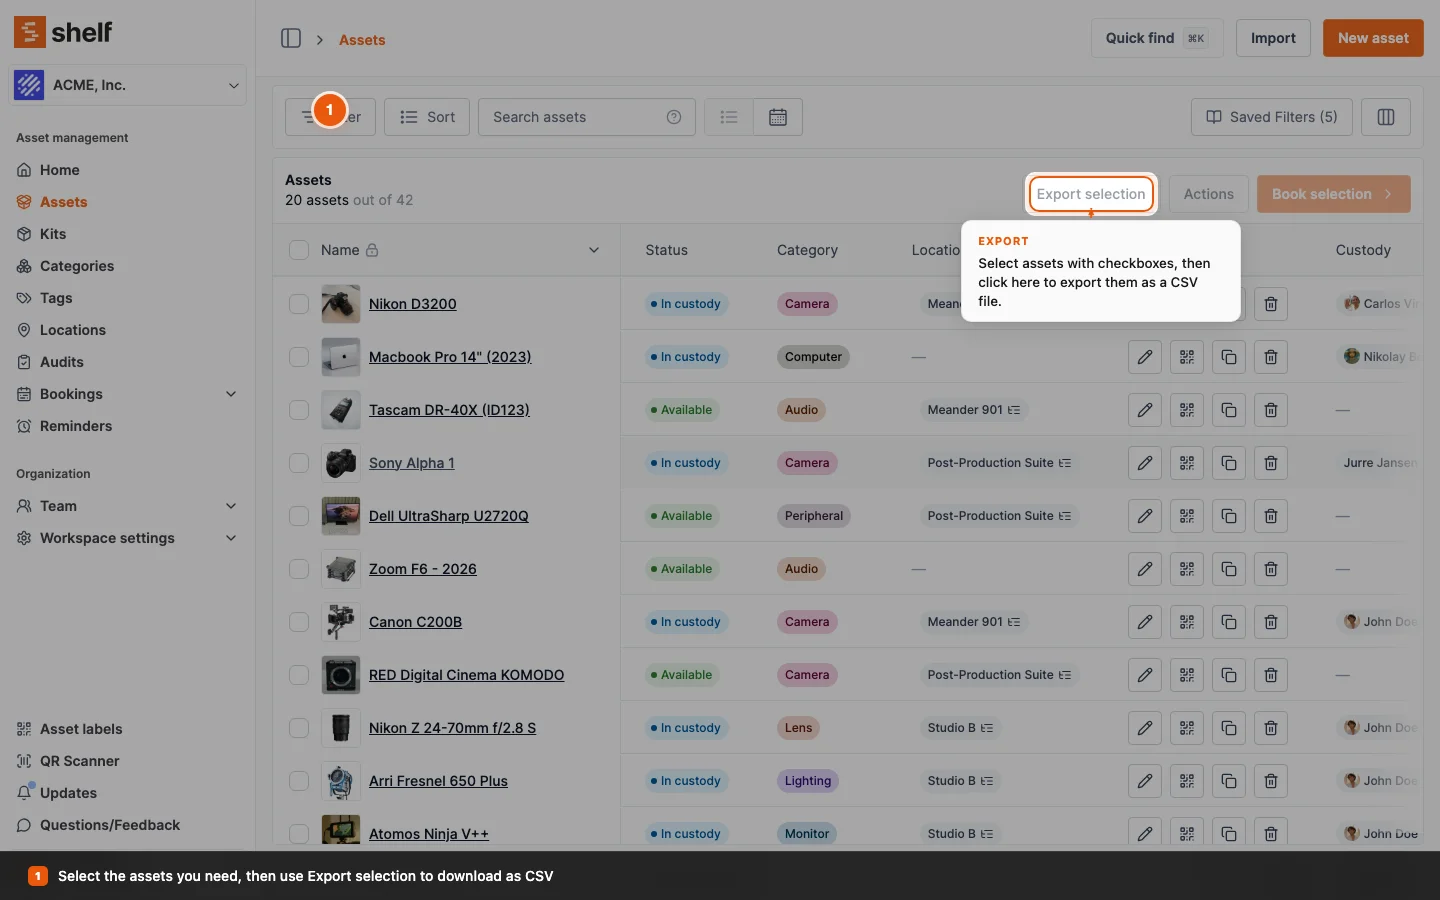
- Navigate to the Assets index
- Select the assets you want using the checkboxes
- Click Export selection at the top of the asset list
- Pick a Format and a Columns scope (see Choosing an export format below)
- Click Download CSV
2. Export a Filtered View
- Apply any filters in the Assets index (category, location, custodian, tags, status)
- Click Select all X entries to include all matches across every page
- Click Export selection, pick your format, and click Download CSV
Your current search and filters are carried into the export, so the file contains exactly the rows you can see.
Filter-then-export is the most common reporting path — see Common reporting scenarios below. For the full filtering reference, see Advanced Asset Index: Complete Guide.
If you run the same report every month, save the filter once and pick it from Saved Filters each time. See Saved Filters.
3. Workspace Backup (full export)
- Go to Workspace Settings → General
- Click Download CSV to get a complete backup of every asset in the workspace
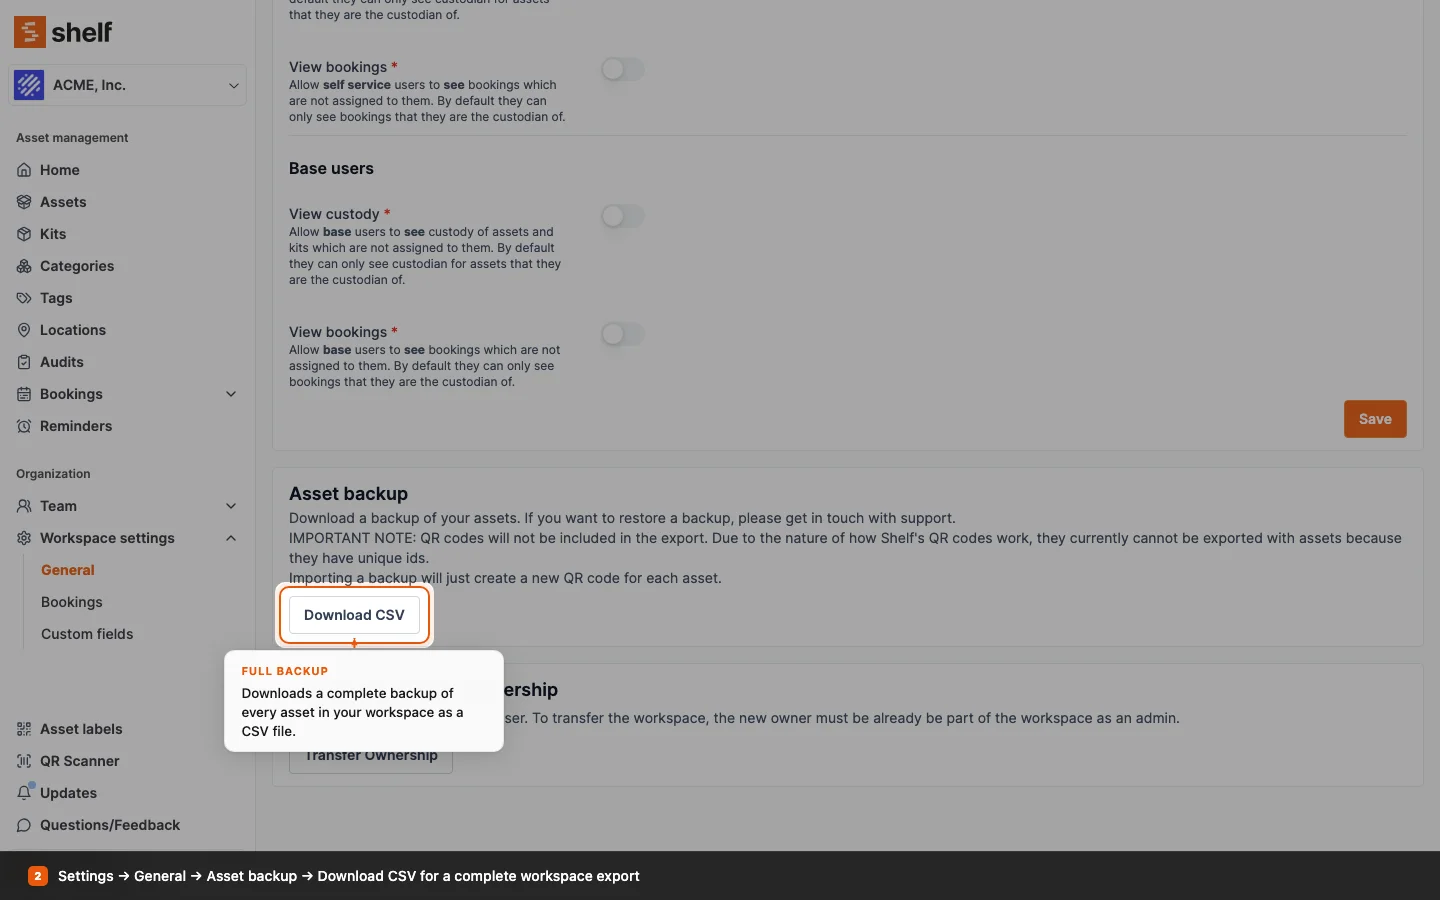
Important: QR codes are not included in the backup. Shelf's QR codes are tied to unique system IDs — if you restore a backup, the system issues new QR codes for the restored assets. Contact support if you need a full restoration.
Choosing an Export Format
When you click Export selection, Shelf asks two questions before it builds the file.
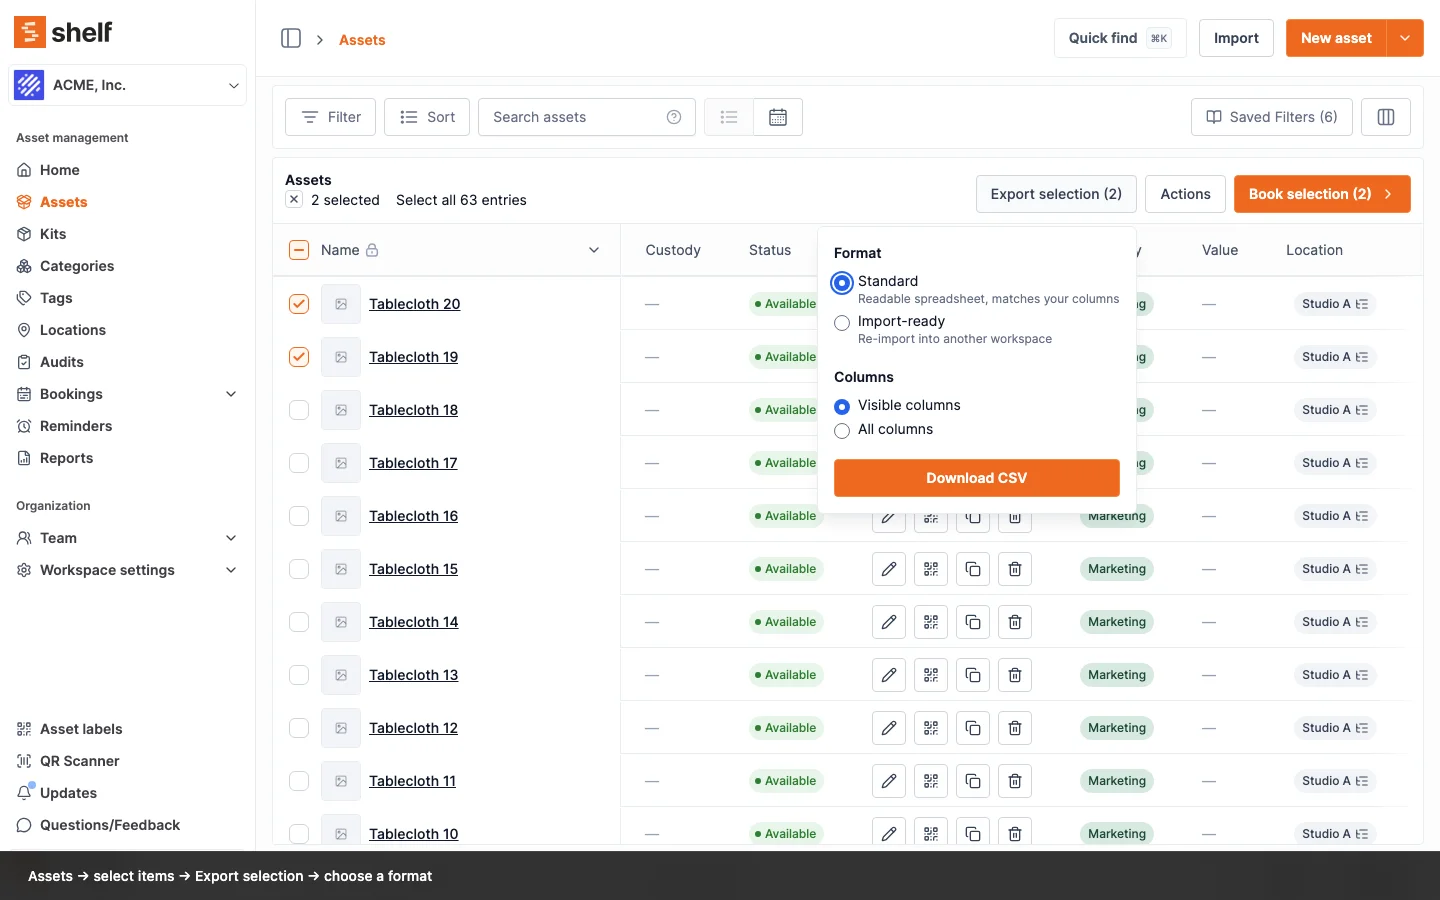
Format
- Standard: a readable spreadsheet that mirrors what's on your screen: display labels, formatted values, and a total value column. Use it for reporting, insurance schedules, budget reviews, and anything a person will read.
- Import-ready: the same assets written with the importer's own column headers and values. Use it whenever the file is going back into Shelf. It does two jobs from one download: upload it into another workspace through Assets → Import to recreate the assets there, or upload it to Assets → Import → Update existing to edit the very assets it came from.
An Import-ready export quotes every cell. Where a tag name or a barcode value contains a comma, it is also quoted inside its cell, so Berlin, DE comes back as one tag when you upload the file again. The Standard export lists tags for a reader, separated by commas, so use Import-ready for any file that goes back into Shelf.
An Import-ready export always starts with an id column, in either column scope. That is what lets the update flow match each row back to its asset. The create flow ignores the column, since those ids belong to the workspace that issued them.
Columns
- Visible columns: only the columns currently shown in your index.
- All columns: every available column, regardless of what's displayed.
Switching to Import-ready selects All columns for you, since a fuller file re-imports more completely. You can switch back to Visible columns if you only want a subset: Import-ready always keeps id plus the fields required to recreate an asset (title, type, quantity, minQuantity, unitOfMeasure, consumptionType), so a trimmed file still imports and still updates.
Moving Assets to Another Workspace
Import-ready exports are built for exactly this. Export from the source workspace, then import the file into the destination workspace with Assets → Import. The importer creates the categories, tags, locations, custodians, asset models, kits, and custom fields it finds by name, so you don't have to set anything up first.
Two fields are deliberately left out:
- QR IDs are tied to the workspace that owns them, so they can't travel. Assets get fresh QR codes in the destination workspace.
- Images aren't carried over yet, so asset photos need to be re-added after the import. For a fleet of identical units there is a shortcut: the importer recreates your asset models by name, so uploading one cover image on the model in the destination workspace gives every unit of that model a picture in a single step.
Everything else, including barcodes and custom field values with their types, comes across. See Importing Assets to Shelf: CSV Guide for the import side.
What's Included in Each Export
Standard exports include the columns you chose in the export dialog: either the ones currently visible in your view, or all of them. Customize which columns display by clicking the Columns control in the top-right of the index.
Typical fields included:
- Name, Description, Category, Tags, Location
- Status (Available, In custody, etc.)
- Custody (the current custodian)
- QR ID and Asset ID / SAM ID
- Value, Purchase date, any other custom fields you've defined
- Activity history (on selected exports; not on filtered views)
The workspace backup is broader and includes internal fields not intended for re-import.
How the file is encoded
Every CSV Shelf hands you is written as UTF-8 and carries a byte order mark, and the download says charset=utf-8 on the wire. That mark is what tells a spreadsheet application which alphabet it is reading. Without it, Excel falls back to whatever codepage the machine happens to use, and Arabic, Cyrillic, Greek, Hebrew, CJK and even plain accented Latin come out as unreadable symbols.
So a file exported from Shelf opens correctly on the first try, in Excel, Numbers, LibreOffice and Google Sheets, with no import wizard and no encoding to pick. It holds for all of them: the asset index export, the workspace backup, bookings, report exports, non-registered members, and the activity note exports on assets, bookings, audits and locations.
The mark does not travel into your data. Shelf's own importer strips it, so a file you export, edit and upload again round-trips cleanly, and so does a file Excel saved with a mark of its own.
Dates in exported files
Dates in a CSV are written in your own date format, time format, and time zone, the ones set under Account settings → General, so a downloaded file reads the same way the screen does. A colleague with different settings who exports the same assets gets the same dates written their way. See Date, Time and Timezone Preferences.
Common Reporting Scenarios
Assets assigned to a specific custodian
- Click Filter → choose Custody → pick the person
- Select all filtered results
- Export selection
Useful for offboarding reports, asset recovery after a role change, or quarterly accountability reviews.
All assets in a given category
- Filter → Category → pick the category
- Select all → Export selection
Useful for category-level financial reporting or insurance documentation.
Available assets in a specific location
- Filter → Status =
AvailableAND Location = the site - Select all → Export selection
Useful for what-can-I-pick-up-today snapshots for teams planning on-site work.
Assets due for maintenance
- If you track maintenance dates in a custom field, filter by that field
- Alternatively, use tags (e.g.
needs-service) and filter by tag - Export the list to drive a maintenance schedule
See Asset Reminders for setting up maintenance reminders alongside your exports.
Using Exports for Bulk Updates
A common workflow: export a filtered selection, edit the CSV in Excel or Google Sheets, re-import to apply changes at scale. The Update Existing Assets feature handles this with a preview step that shows every field change before anything is saved.
Important: Only use Asset Index exports for re-import updates, not the Workspace Backup CSV. Backup exports store category, tags, and asset model as raw data rather than plain names. Shelf recognizes a backup file and stops with an explanation rather than proposing changes from it.
Pick Import-ready. It carries the id column the update flow matches rows on, and it writes quantity-tracked fields in the shape that flow expects: quantity as a plain number, plus minQuantity, unitOfMeasure, and consumptionType as their own columns.
A Standard export can be used as well, with two caveats:
- It only carries an
IDcolumn when that column is visible in your index or you pick the All columns scope. - Its quantity cell includes the unit, as
10 boxes, and the update flow needs the number alone.Min quantity,Unit of measure, andConsumption typeare not in a Standard export, so add those columns yourself, spelled exactly that way, when you want to change them in bulk.
Full walkthrough: Bulk Updating Assets via CSV.
Troubleshooting
Getting unexpected results when filtering?
- Check for conflicting filters applied simultaneously
- When filtering by custodian, remember registered users and Non-Registered Members (NRMs) are handled separately
- Clear all filters and re-apply one at a time if results look wrong
Export missing columns you expect?
- Click the Columns control and verify the fields you want are enabled
- Reorder columns before exporting — the CSV respects the current display order
Non-Latin characters look like symbols in Excel?
- Re-download the file. Exports now carry a UTF-8 byte order mark, so Excel reads the alphabet correctly without an import wizard. Files downloaded before that change need to be exported again.
- If a re-exported file still looks wrong, check whether the file was opened and re-saved in an application that dropped the encoding on the way.
Too much data to export at once?
- Narrow with filters before selecting
- Export by location or category in separate passes
Exporting Other Data Types
- Bookings — separate export flow. See Exporting Booking Information.
- Audits — open the audit and choose Actions → Download Receipt for a PDF holding the counts, the full asset table, the audit photos, and the activity log. There is no CSV of audit results; the audit's Activity tab exports its note log separately as CSV. See Audits.
- Team members — the Team page has its own export option for user lists.
Related Articles
- Advanced Asset Index: Complete Guide — full filtering, sorting, and column reference
- Bulk Updating Assets via CSV — export + edit + re-import workflow
- Importing Assets to Shelf: CSV Guide — the import side of the same workflow
- Using Batch Actions in Shelf — bulk changes without exporting
Ready to try Shelf?
Put what you're learning into practice. Free plan available — no credit card required.