Run Your First Audit
Step-by-step guide to running your first physical inventory audit in Shelf — from creating the session to exporting the PDF report. Covers the 7-day free trial.
Audits let you verify that what's physically in a location matches what your records say should be there. Shelf flags what was found, what's missing, and anything unexpected that showed up. When the audit is done, export a PDF report.
Audits is a paid add-on available on any Shelf plan. It includes a 7-day free trial so you can test it on your own inventory before committing. This guide walks you through your first audit — start to finish — in about 20 minutes.
Before You Start
You need three things in place:
- Assets in Shelf — at least a few items in the location you plan to audit. If your inventory is empty, add some assets first.
- QR labels on those assets — the audit scan page reads QR codes to confirm physical presence. If you haven't printed labels yet, see Using Shelf QR Codes with Avery Label Sheets or Printing Custom Branded QR Code Labels.
- Audits activated — from the sidebar, click Audits. If you haven't activated the add-on yet, Shelf will prompt you to start the 7-day trial. No credit card required.
Step 1: Create an Audit Session
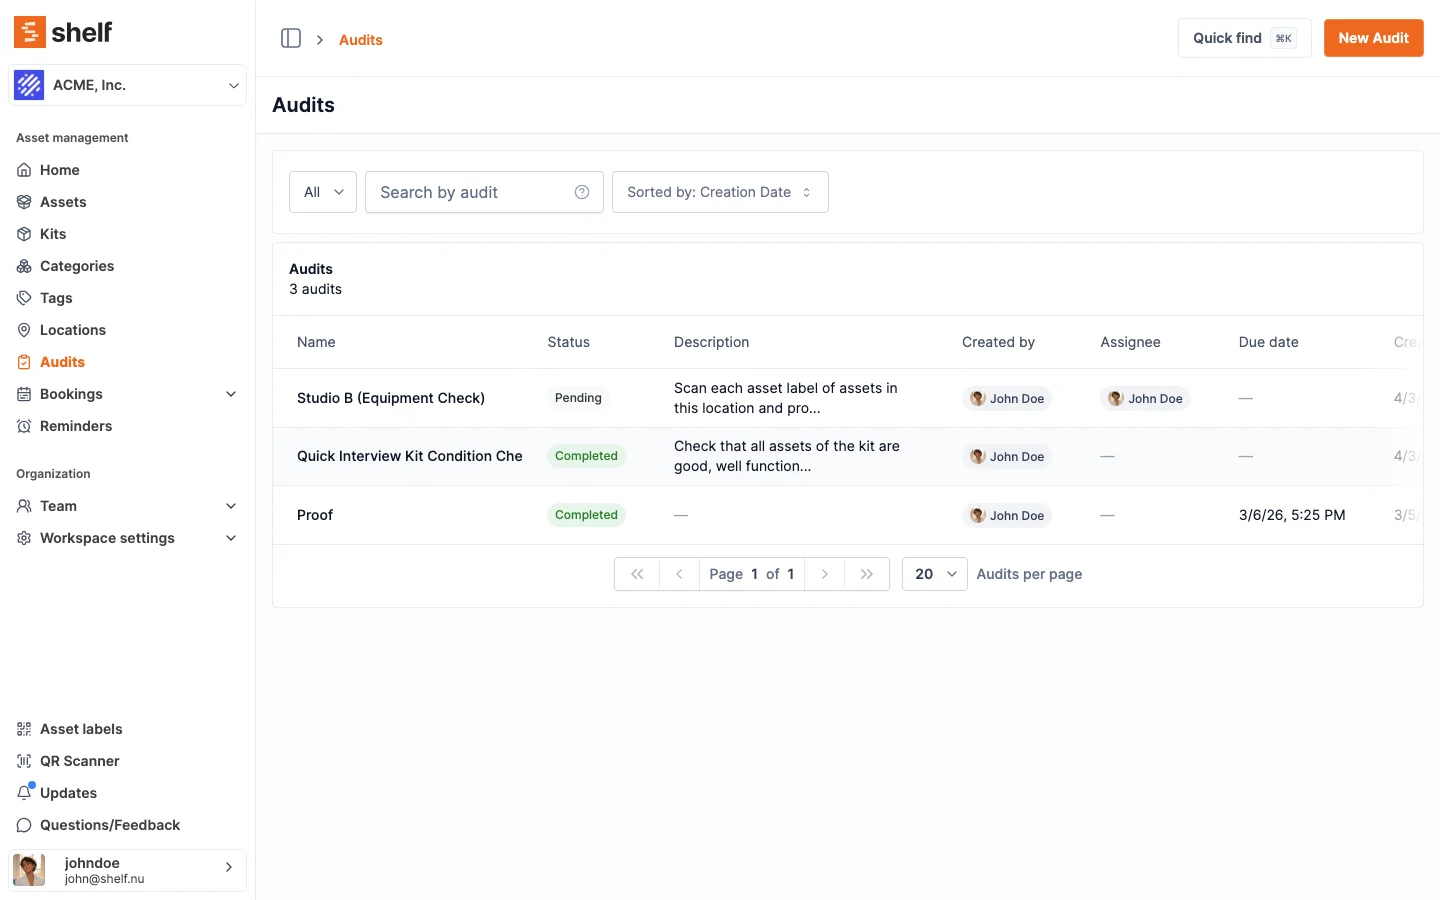
- Click Audits in the sidebar
- Click New Audit (top-right)
- Fill in:
- Name — something descriptive for your team (e.g. "Studio B Equipment Check", "Server Room Q2 2026")
- Description (optional) — instructions for the person doing the scan (e.g. "Scan each asset and provide a condition photo")
- Due date (optional) — when the audit should be completed by
- Select which assets to include — you can scope by location, category, tag, or any combination. Shelf builds the "expected" asset list from your current records.
- Assign the audit (optional) — pick a team member who'll do the scanning. If you leave this blank, any admin can open the scan page.
- Click Save to create the session
Shortcut: start an audit from your Locations or Kits. Instead of building the scope inside the dialog, you can kick off an audit straight from a list page. On the Locations page (or the Kits page), tick one or more rows, open the Actions dropdown, and choose Create audit. Shelf creates a single audit covering the union of every asset across the selected locations or kits — ideal for a room-by-room sweep or for confirming kit contents are complete. If you select all with a search or filter active, only the matching rows are included. You'll still name the audit and (optionally) assign it before it's created.
Step 2: Open the Audit Overview
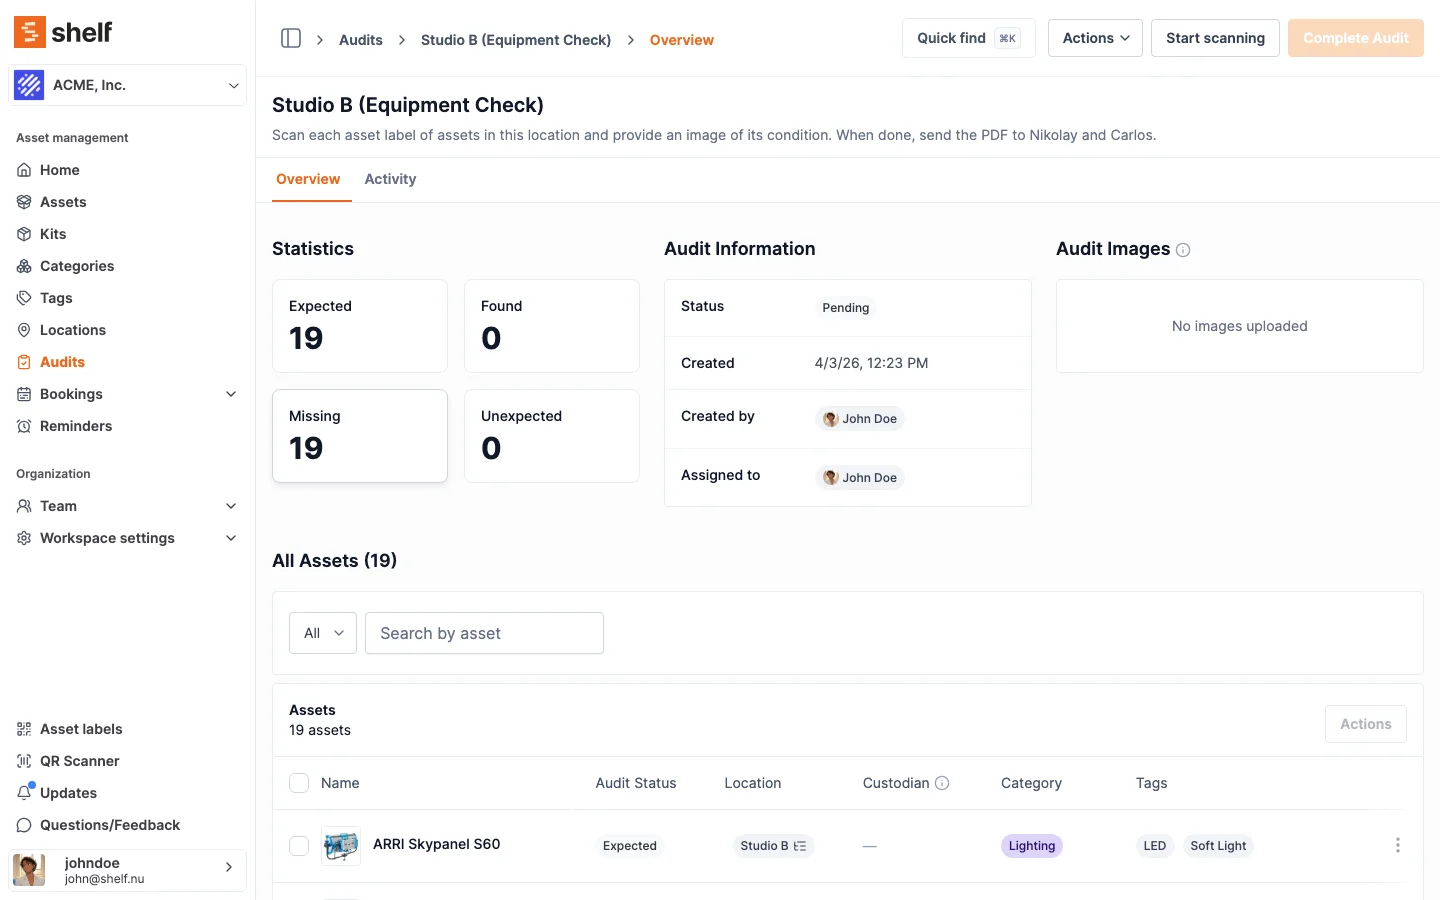
Click into the audit you just created. The Overview tab shows:
- Statistics — Expected / Found / Missing / Unexpected counts (all zeros at the start)
- Audit Information — status, created date, assignee, due date
- Asset list — every asset Shelf expects to find, with an "Expected" status chip
This is your live dashboard. As scanning progresses, the counters update in real time.
Step 3: Start Scanning
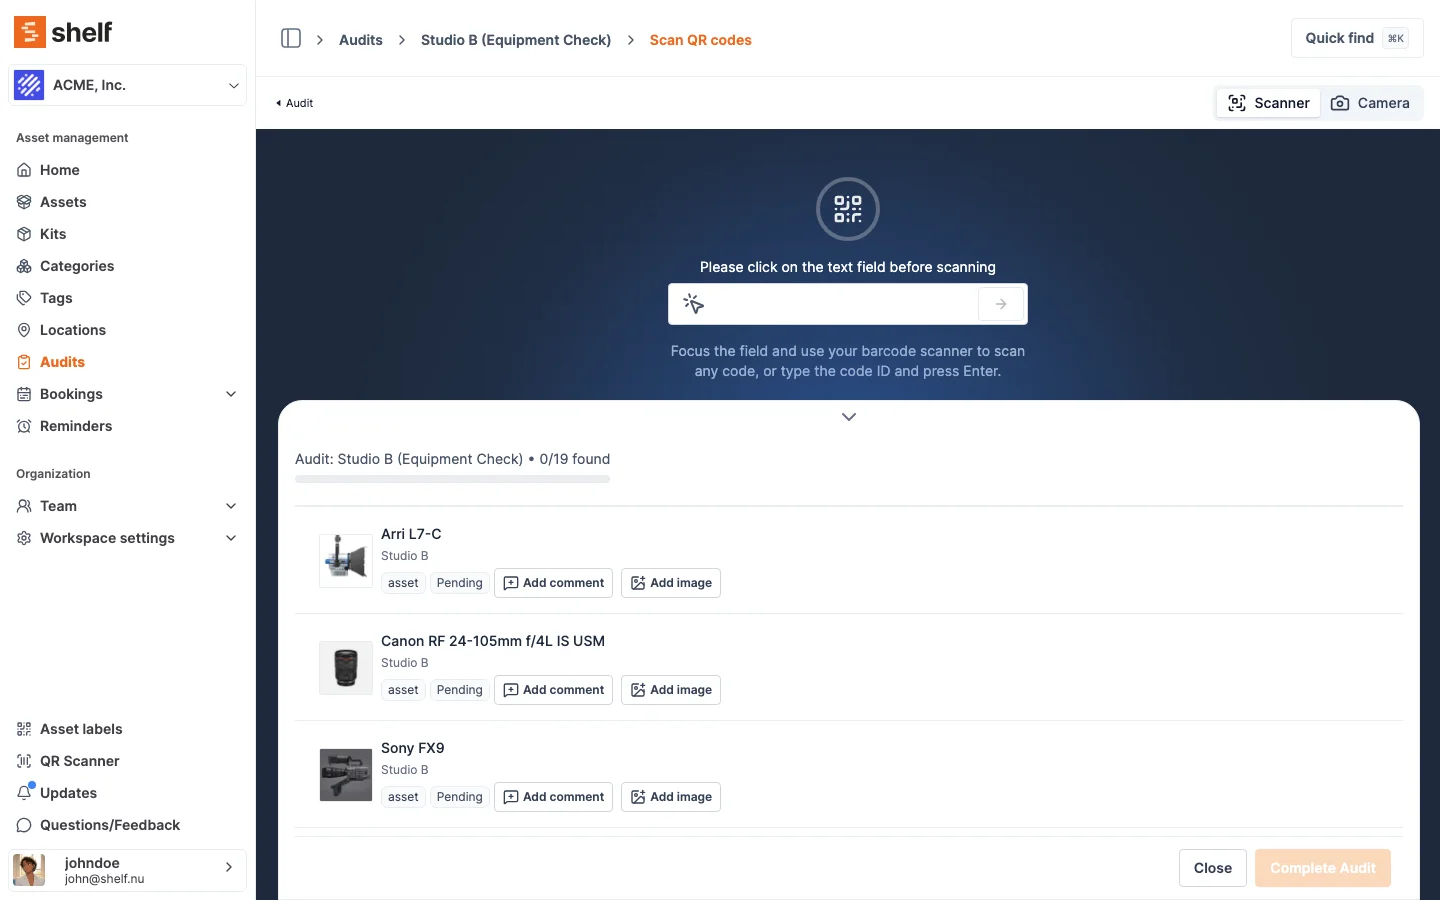
Click Start scanning (in the header) to open the dedicated scan page. This page is purpose-built for audits — separate from the regular QR Scanner — so there's no confusion about which workflow you're in.
Two ways to register assets:
- Scanner mode — focus the text field and use a handheld barcode scanner to scan QR labels rapid-fire
- Camera mode — toggle to Camera in the top-right and use your phone or laptop camera to scan the QR
Each scan registers the asset as Found. The progress bar updates live: "Audit: Studio B (Equipment Check) • 3/19 found".
You can also Add comment or Add image per asset during the scan — useful for documenting condition, damage, or wrong labels.
Step 4: Review Results
Go back to the Overview tab at any point to check progress. Four statuses:
| Status | Meaning |
|---|---|
| Found | Scanned and matches the expected list |
| Missing | Expected but never scanned — the item might be misplaced, lost, or mislabelled |
| Unexpected | Scanned but NOT on the expected list — the item has moved from another location, or was never recorded |
| Pending | Not yet scanned |
Use the Filter by audit status dropdown to isolate missing or unexpected items for follow-up.
Step 5: Complete the Audit
When scanning is done:
- Click Complete Audit (bottom-right of the scan page, or from the Actions dropdown on the overview)
- Shelf sends a summary email to the audit creator with final counts
- From the completed audit's overview, click Actions → Download Receipt to export a PDF report with found/missing/unexpected breakdowns
The PDF is your compliance artifact — hand it to insurance, your manager, or file it for regulatory review.
After the Trial
The 7-day trial gives you unlimited audits. When it expires:
- Completed audits stay visible — you keep full access to results, reports, and PDFs from audits run during the trial
- New audits require the paid add-on — activate from Audits in the sidebar; pricing is managed through your Shelf account
- No data lost — nothing is deleted when the trial ends
If you found value during the trial, the add-on is available on every Shelf plan (Free, Plus, Team, Enterprise).
Tips for a Successful First Audit
- Start small: audit one room or one category, not the entire inventory. Prove the workflow before scaling.
- Print test labels first: run a test print and scan several codes before committing a full batch.
- Assign the audit to yourself for your first run — you'll understand the scan flow before delegating to someone else.
- Use the camera toggle on your phone if you don't have a handheld scanner. It works with any phone camera, no app needed.
- Add photos during the scan for anything that looks damaged, misplaced, or mislabelled — it saves a second pass later.
FAQ
Can multiple people scan the same audit?
Currently, each audit session supports a single assigned scanner. For large-scale audits, create multiple sessions scoped to different areas and assign each to a different team member.
Can I create an audit from the Locations or Kits page?
Yes. You don't have to build the scope inside the New Audit dialog. On the Locations page or the Kits page, select one or more rows, open the Actions dropdown, and choose Create audit. Shelf creates one audit covering the union of every asset across the selected locations or kits. Selecting all with a search or filter applied audits only the matching rows. This is the fastest way to start a multi-location or multi-kit audit, and it requires the same permission as the New Audit button — so anyone who can already create audits can use it.
What happens to assets marked "Missing"?
Nothing is automatically changed in your Shelf database. Missing means "expected but not scanned" — you decide what action to take: follow up with the last known custodian, mark as lost, or investigate.
Can I re-open a completed audit?
No. Completed audits are final — their results, statuses, and PDF receipt are preserved exactly as they were when the audit closed.
If you want to re-run the same scope, duplicate the audit instead of starting from scratch. Admins and owners can open any Completed, Cancelled, or Archived audit, click Actions → Duplicate audit, and Shelf creates a fresh Pending session with the same asset list, name (with a "(Copy)" suffix), and description. No notes, scans, or assignee carry over — the duplicate is ready to scan. See Duplicate an Audit for full instructions.
Can I cancel an audit?
Yes. The audit's creator can cancel their own audit at any time before it reaches Completed, Cancelled, or Archived. Owners and admins can also cancel any audit in the workspace — including audits created by other team members — using the same Actions → Cancel menu. Self-service and base users can only cancel audits they created themselves.
Can I archive old audits?
Yes. Admins and owners can archive any Completed or Cancelled audit via Actions → Archive. Archived audits are removed from the default list but stay accessible via the status filter.
Can I permanently delete an audit?
Yes. Admins and owners can permanently delete any Archived audit — archiving must happen first as a safety step. Open the archived audit, click Actions → Delete, and type the audit name to confirm. To delete multiple audits at once, filter the list by Archived, select them, and choose Delete from the Actions dropdown (type DELETE to confirm). See Permanently Delete Archived Audits for full instructions.
Related Articles
- Audits Feature Overview — full feature description, pricing, and FAQ
- Duplicate an Audit — re-run the same scope without rebuilding the asset list
- Bulk Archive Audits — keep the audit list focused once recurring audits accumulate
- Permanently Delete Archived Audits — remove archived audit history when no longer needed
- Adding New Assets — prerequisite: get assets into Shelf
- Using Shelf QR Codes with Avery Label Sheets — print QR labels for the assets you'll scan
- Using External Barcode Scanners with Shelf — hardware scanner setup
Ready to try Shelf?
Put what you're learning into practice. Free plan available — no credit card required.